
For a recent project, I decided to make the leap and go serverless. For smaller or new projects, the benefits had become too attractive to pass up – low startup and lower overall costs, on demand scaling, no servers to maintain or manage. What’s not to love?
For the APIs, going serverless is a no-brainer. Lots of people have done it, there are plenty of examples, and the cloud providers have extensively documented the process. When it comes to running a serverless database, not so much. I really liked the idea of using Amazon’s Aurora Serverless MySQL for the back-end, but my biggest stumbling block was connecting to it in case I needed to do database administration tasks.
After some online research, piecing together a few articles, and a bit of experimentation, here’s how I setup a serverless MySQL database using Amazon Aurora and then connected to it with HeidiSQL to manage it in a Windows environment.
What We’re Going to Do in this How-to
By the end of this post, you will have done the following:
- Created a serverless MySQL database using Amazon Aurora
- Connected to the database using HeidiSQL in a windows environment
Please note that Amazon AWS does not offer a free tier for their serverless MySQL database. You will incur charges for the compute cycles and for the database storage, which you can estimate on Amazon’s pricing page here. There’s also a couple of good pricing examples on the Aurora Serverless overview page here.
Prerequisites
Before we get into the details, there are a few things that you’re going to need to have in place before you can complete this how-to.
- An Amazon AWS account
- The ability to login as a user in the AWS account with privileges to create services and manage security groups
- Have a Linux-based EC2 instance running that you are able to SSH into using PuTTY. The serverless database you create MUST be setup in the same region as the EC2 instance. We will be using this instance to connect to the serverless MySQL database using an SSH tunnel since you cannot directly connect to a serverless database using a public IP at the time of this article (April 2019).
- HeidiSQL installed. HeidiSQL is an open-source administration tool for MySQL. You can download a copy from their website here.
Let’s get started.
Create the Serverless MySQL Database
Step one: Select the Amazon RDS Database Service
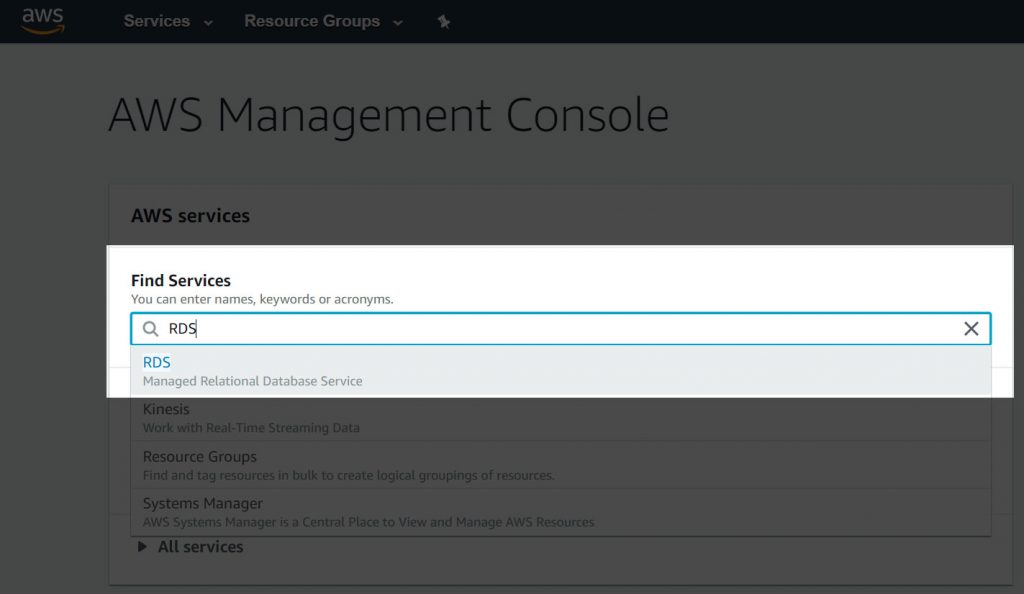
Once you have logged into your AWS account, type ‘RDS’ into the Find Services search box. Select ‘RDS – Managed Relational Database Service’
Step two: Start database creation
From the RDS landing page, select the orange ‘Create Database’ button

Step three: Select Database Engine
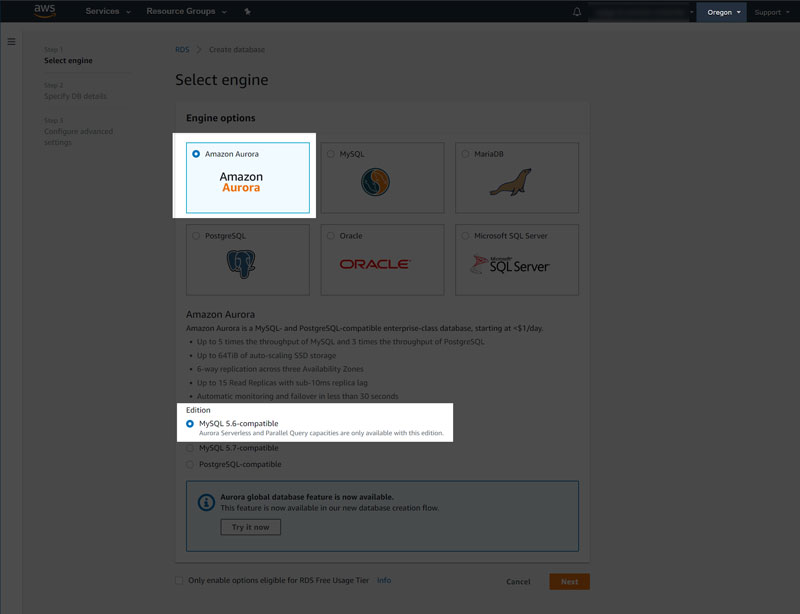
Select Amazon Aurora as the database engine, and under ‘Edition’, be certain to select ‘MySQL 5.6-compatible’ as this is the only version of MySQL that serverless currently works with as of April 2019. It is also very important at this point that the region you are setting up the database in is the same region that your EC2 instance is running in. This is set in the upper right-hand corner, which was ‘Oregon’ for my case. Select ‘Next’ in the lower right corner when you are ready to move on.
Step four: Specify Database Details
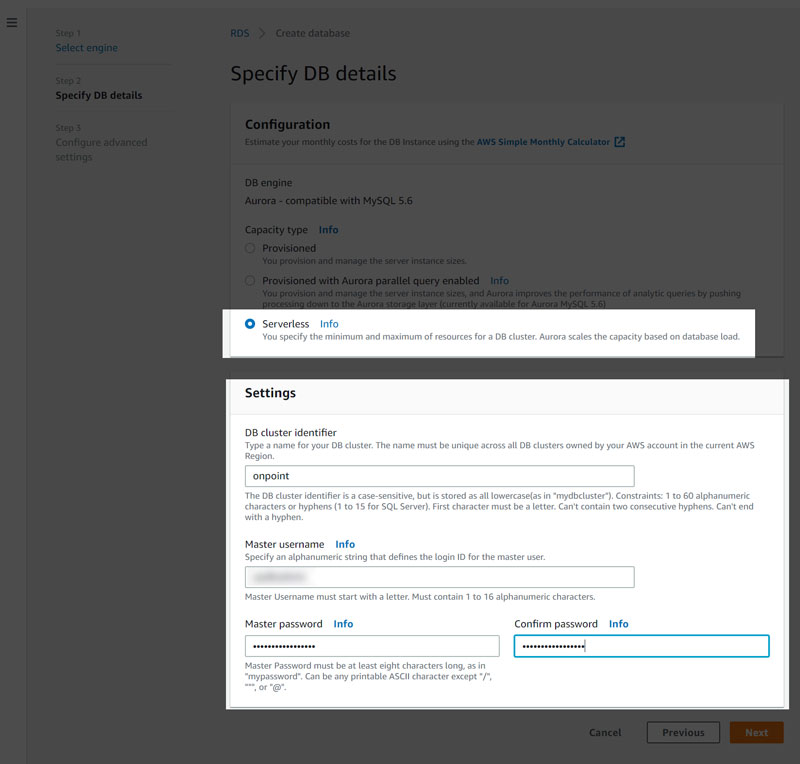
Now it’s time to specify the database details. Under ‘Configuration’ select ‘Serverless.’ Then, fill-in the Settings. You can select any name you like for the ‘DB cluster identifier.’ It’s the name you’ll see in the RDS overview for your database. Select a ‘Master username’ such as ‘root’, or you can select a more obscure name. This is the user you will select to connect to the database so you can manage the database, create and manage other users, and perform other global database administration tasks. Finally, select your passwords, and then select ‘Next’ when you are ready to move on.
Step five: Advanced Settings
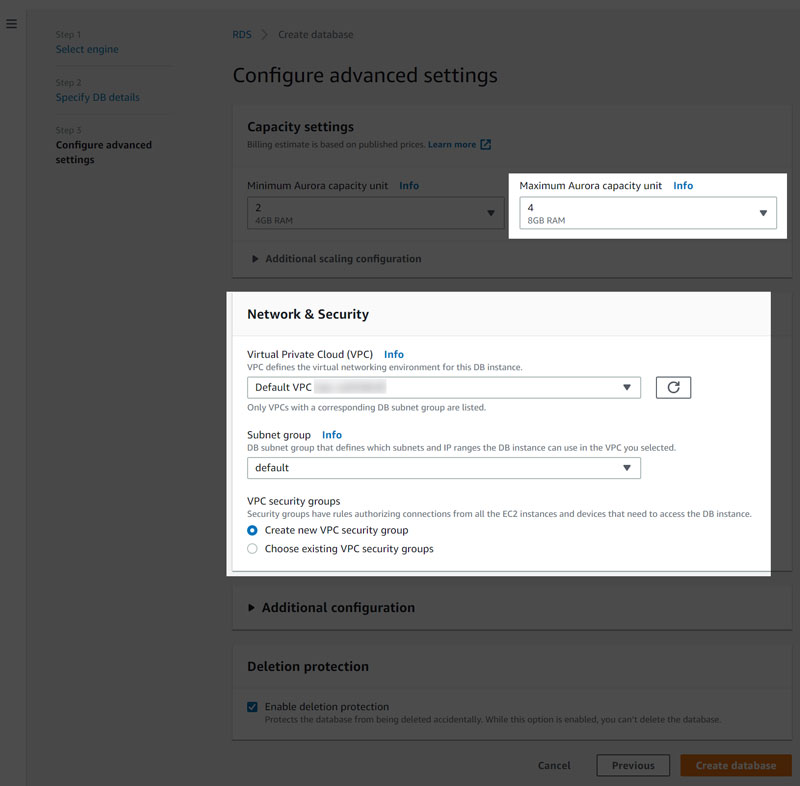
We’re almost there. The last step is to setup the advanced settings. Keep in mind that you can change the capacity settings at anytime in the database configuration options, so don’t stress about those choices. For the most part, I left everything as default, except the following. I changed the ‘Max Aurora Capacity Unit’ to ‘4’ to avoid incurring unnecessary charges during startup. The most important step is to select the VPC that contains the EC2 instance that you will use to connect to your database. Then create a new VPC security group in the VPC to manage the connections to the database.
Step six: Click and Wait
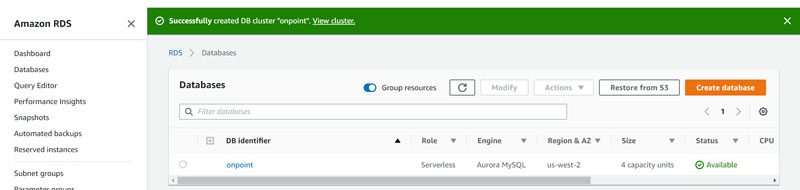
When you’re ready, click ‘Create Database’, sit back and relax. Amazon AWS will do its thing and spin up your serverless database. Within a few minutes, you should see a success message, and you’re new database is ready to go. It should look something like this.
However, before we can connect to it with HeidiSQL, we need to setup a couple of security rules to permit the connection first.
Setup the Security Rules for Connecting to the Database
Now that you have a serverless database setup, it’s time to setup the security rules so you can connect to it with the EC2 instance you have running in the same region. Remember, we can’t connect to the database directly. We’re going to be connecting to the database with HeidiSQL using an SSH tunnel through the EC2 server.
Step one: Navigate to the AWS VPC Service
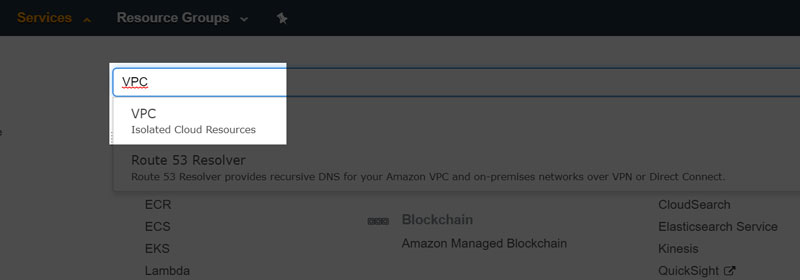
Select ‘Services’ from the top nav bar and type ‘VPC’ into the search box. Select ‘VPC – Isolated Cloud Resources’ from the dropdown.
Step two: Navigate to Security Groups
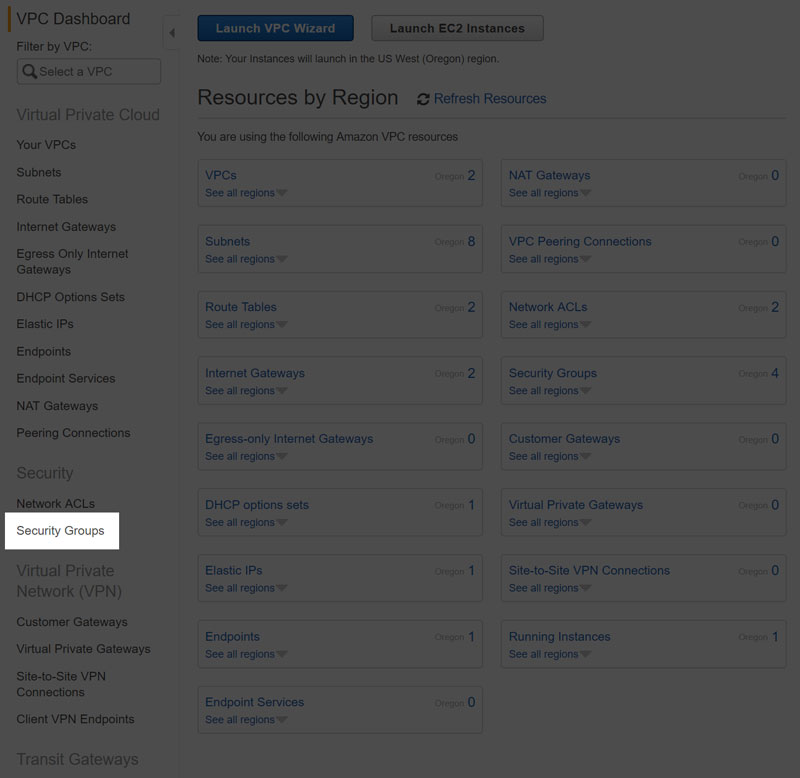
In the VPC dashboard, select ‘Security Groups’ from the left hand navigation pane.
Step three: Select the Database Security Group
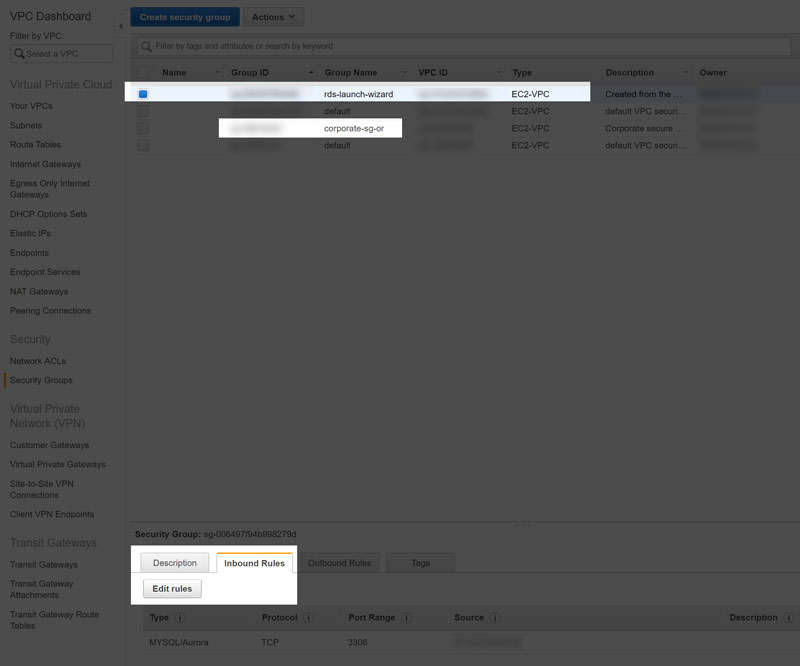
Follow closely, because there are four things we need to do on this screen to continue. First, select the security group with the Group Name ‘rds-launch-wizard’. This is the VPC subnet that was created when the serverless database was created. Next, note the Group ID where the EC2 instance is running, which in my case has the Group Name ‘corporate-sg-or’. I’ve blurred out my Group ID, which is fine since yours will have its own name and ID. Next, select the ‘Inbound Rules’ tab at the bottom of the screen. Finally, select ‘Edit Rules’.
Step four: Enter New Rule (or Edit existing)
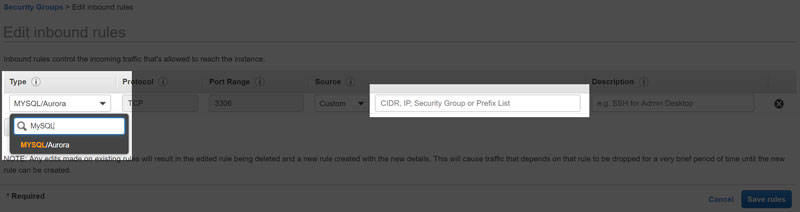
Select ‘Add Rule’ on the inbound rules screen and choose Type ‘MySQL/Aurora’ which you can find from the dropdown or by typing in the search box. Then, under source, starting typing in the security group id you copied down in the last step that contains your running EC2 instance. You should see it appear in a dropdown list. Select it and save. Alternatively, you may see an existing rule in your database set to your machine’s IP address. You can edit this rule and change it to the EC instance security group id since you will not be able to connect to the serverless instance through a remote IP address.
Now that the security rules are setup, let’s connect to it with HeidiSQL!
Connect to the Database Using HeidiSQL (via SSH Tunnel)
Step one: Open HeidiSQL and Start a New Connection
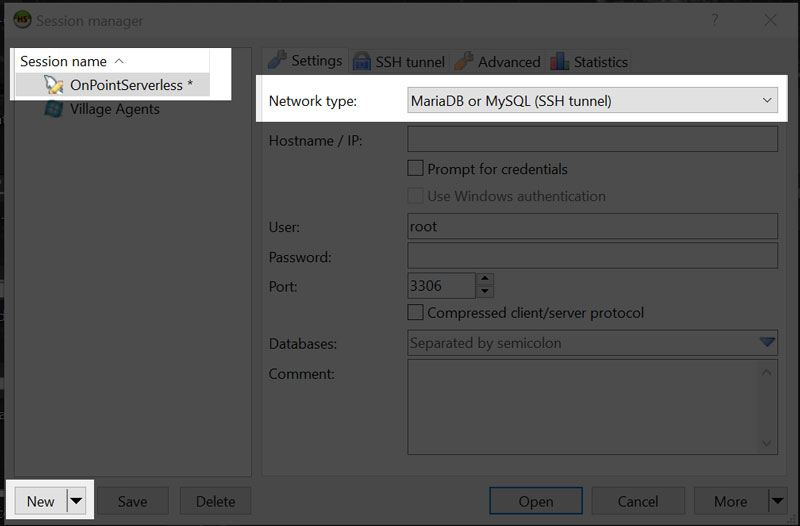
Now for the part we’ve been waiting for. Launch HeidiSQL. The ‘Session manager’ should appear. Select ‘New’ connection in the lower left corner, name it something meaningful in the session name pane (I called my ‘OnPointServerless’) and select ‘MariaDB or MySQL (SSH tunnel)’ in the Network type dropdown. Don’t open or save yet. We have to collect a couple of other pieces of information before we can continue.
Step two: Get the Database Endpoint
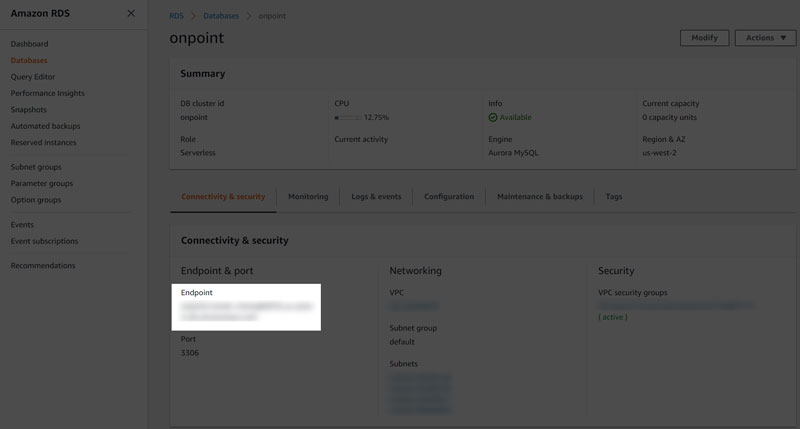
Go back to the RDS services area in AWS, go to the databases, select your serverless database, and then select the ‘Connectivity & security’ tab. You’ll want to copy the Endpoint from that screen (I’ve blurred mine as yours will be different).
Step three: Enter Database Information into HeidiSQL
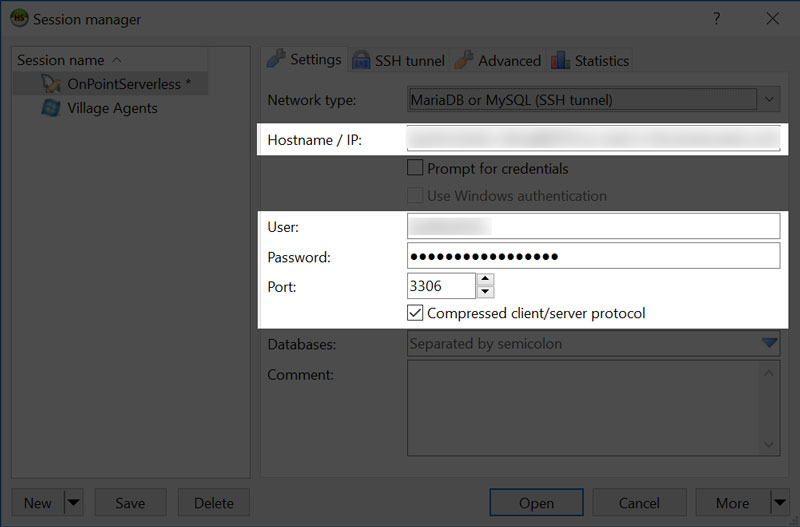
Go back to the HeidiSQL Session Manager and put in the Database Endpoint into the Hostname/IP box, and put in the user and password that you created for the serverless database. Leave the Port as 3306, and tick the box ‘Compressed client/server protocol’
Step four: Enter SSH tunnel information
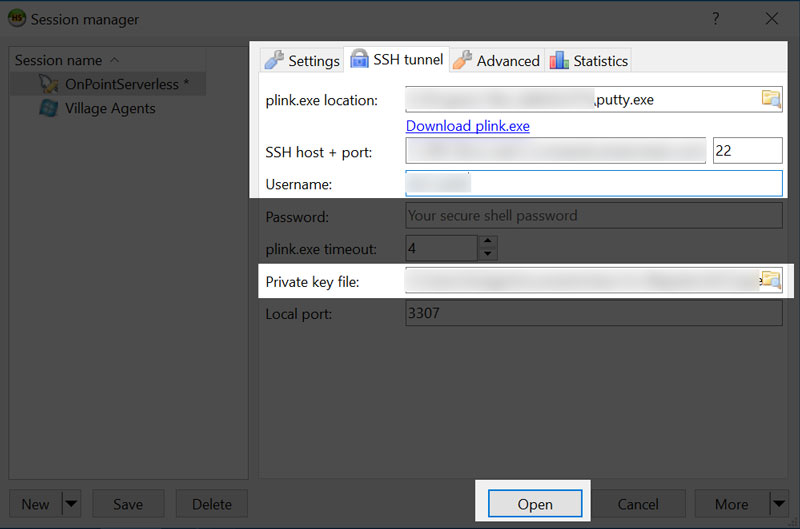
Now switch over to the SSH tunnel tab in the Heidi SQL Session manager. This is going to take a bit of effort on your part to find a few files on your filesystem, so bear with me. First, in the box labeled ‘plink.exe’ browse to the location where your PuTTY executable is located, and select the putty.exe file. For SSH host + port, you’ll need to enter the public-facing host name for your EC2 instance (do not prefix with <username>@). I referenced my public-facing name from the PuTTY setup I use to access my instance. For Username, put in the username you use to access your EC2 instance. The final step is to put in the private key file that you use to access your EC2 instance. Once you’ve entered all the values, select ‘Open’.
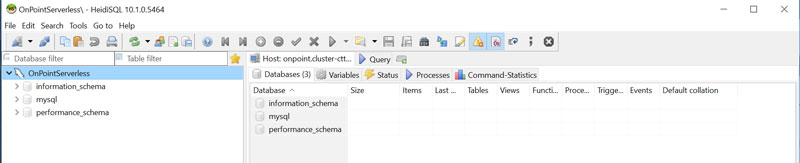
You’ll need to wait a few seconds while the instance spins up to establish your connection. If all your values are entered properly, you’ll see the default databases in the instance and be ready to go!
Resources
The following links were especially helpful in my research for creating this how-to:
Accessing RDS using HeidiSQL – a little light on details, but had just enough information to convince me that it was possible.
Configure and Connect to Serverless MySQL Database – Amazon puts out great documentation, in my opinion. Their tutorial was very useful, but it uses their Cloud 9 IDE as a means to perform the connection. HeidiSQL provides a richer client interface and makes it easier to perform database administration tasks.
Disclaimer: I don’t work for Amazon or have a vested interest in HeidiSQL. I documented these instructions to share what I learned piecing information together from a couple of articles in hopes it would help others down this path, and save you some time. I also did it for my own personal use in case I need to reference it later to remember and recreate what I did. You are more than welcome to reference my experience, but keep in mind that they these instructions may or may not work depending on the specifics of your setup or changes Amazon makes to AWS and its Aurora Serverless offering. What I’m trying to say, in not so many words, is that I’m happy to entertain questions you may have in the comments and will do may best to offer assistance, but I cannot guarantee timely and accurate responses.
You great!! I managed to do it with aurora pg sls and dbeaver as client.
This is really helpful