In one of my current projects, I am using a serverless setup in AWS for the API. The project uses API Gateway and Lambda functions. For deployment to AWS, I’m using the serverless framework, which helps to streamline the process.
One of the issues I ran into was verifying the client authorization tokens generated by Firebase in the serverless environment. The brute force approach would have been to verify the token in the Lambda function for each API microservice I created, but this seemed inefficient. I also found that adding the Firebase Admin SDK added a lot of heft to the lambda function. It seemed like there should be a better way, and there is.
The solution for my use case is to use a Custom (aka Lambda) Authorizer in the API Gateway to validate the client token before passing the request to the Lambda function for handling. This allows me to have one lambda function that handles the verification of client authorization tokens for all API routes and methods.
I found some excellent examples of generic Custom Authorizers that use the serverless framework but had a hard time finding something Firebase specific. Using the serverless example of a custom authorizer as a starting point, I created a generic custom authorizer that can be setup to work for any project that is sending client authorization tokens generated by Firebase to the AWS API Gateway.
Here’s information and instructions on using the custom authorizer. The source code is located in the Github repository here – https://github.com/gborodaty/api-gateway-firebase-auth.
The code is effectively a fork of the excellent sample that the serverless team put together which can be found here – https://github.com/serverless/examples/tree/master/aws-node-auth0-custom-authorizers-api
Prerequisites
Using the custom authorizer assumes the following:
- You have installed the serverless framework via npm, preferably globally.
- You have created an IAM user and user profile for your AWS serverless project deployment. You can learn more about creating AWS user profiles in their documentation here – https://docs.aws.amazon.com/cli/latest/userguide/cli-configure-files.html. Serverless also has excellent documentation on setting up AWS credentials here – https://serverless.com/framework/docs/providers/aws/guide/credentials/.
- You are using Firebase to authenticate users and already have a Firebase project created. You can learn more about Firebase projects here – https://firebase.google.com/docs/projects/learn-more.
Creating the Custom Authorizer
To create a custom authorizer for your API Gateway instance, clone or download the custom authorizer GitHub repository, located here – https://github.com/gborodaty/api-gateway-firebase-auth.
Once the files are in your local development area, you will need to create two files, an environment.json and serviceAccountKey,json. Here are the contents for each:
- The environment.json contains information specific to your AWS serverless environment and is used in the serverless.yml configuration file. There’s also some information from the Google Firebase project settings that’s used in the function handler. In your IDE, open up the file, and put in the following variables:
{
  "AWS_PROFILE": "<your_aws_serverless_deployment_profile>",
  "AWS_REGION": "<your_aws_serverless_deployment_region>",
  "FIREBASE_DATABASE_URL": "<your_firebase_database_URL>"
} - Obtain the serviceAccountKeys from Google Firebase for the firebase admin SDK for your project. You can follow Google’s documentation here to get your keys – https://firebase.google.com/docs/admin/setup#initialize_the_sdk. Once you have the file, move it into the directory and rename it to ‘serviceAccountKey.json’.
Once you have these files in place, make sure you have them in your .gitignore. You do not want to commit these to the repository. The repository is already setup to ignore them, so you shouldn’t have to add them, but it’s worth double-checking to confirm.
Also, if you want to change the name of the custom authorizer service in AWS, be sure to change the name in the first line of the serverless.yml file.
Once these files are in place, you can deploy the custom authorizer using the serverless deploy command. The final step is configuring the API Gateway via the serverless framework to use the newly minted custom authorizer to validate the Firebase generated client authorization tokens.
Configuring the API Gateway
While you could setup the custom authorizer using the API Gateway console, it is better to use the serverless framework if you use that to deploy your API microservice Lambda functions.
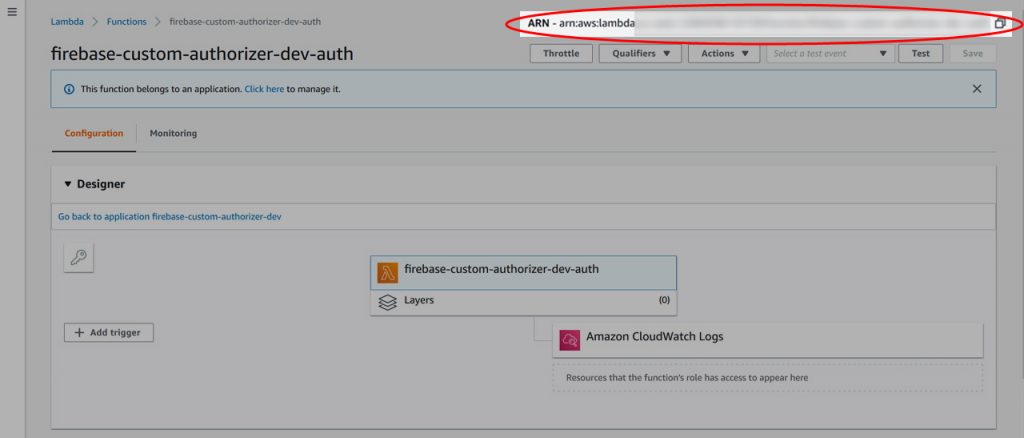
First, you’ll need to get the ARN for the custom authorizer that you deployed to AWS above. You can get that by logging into AWS and going to your Lambda functions. Find the name for your custom authorizer, click on it, and grab the entire ARN in the upper right corner of the screen.
Then go to the serverless configuration file that is used to deploy the API Lambda function (this is not the custom authorizer serverless.yml file). For any http path and/or method that you want to validate a Firebase client generated token on, just add the authorizer property with the ARN name for you custom authorizer.
Once your serverless.yml has been updated, deploy your API using serverless. When you check the API Gateway, you will see that authorization has been added to all the methods and paths where you have added the authorizer property. The API requests will be checked for an Authorization header, and the client tokens will be sent to Firebase for validation.
The API Gateway will return messages to the client for authorization failures. Otherwise, if the authorization is validated, API Gateway passes on the results, along with the request and associated payload, to your API Lambda function for further processing.
Here are some additional resources that may be useful if you run into any issues during the creation, deployment, or processing of responses from the API Gateway:
- Serverless documentation – https://serverless.com/framework/docs/providers/aws/events/apigateway/#http-endpoints-with-custom-authorizers
- Background information on when, and when not, to use custom authorizers: – https://www.alexdebrie.com/posts/lambda-custom-authorizers
- Configuring custom responses from API Gateway – https://github.com/SeptiyanAndika/serverless-custom-authorizer
Finally, here is the code for the custom authorizer.


